Blog

  • Passkeys: A New Era in Digital Authentication

    TL;DR

    People are the weakest link your in security chain. We can all be tricked and few of us are cyber-vigilant 100% of the time.

    Can we improve security and enhance user satisfaction at the same time?

    Passkeys are a revolutionary shift in how we demonstrate “I am who I say I am” (aka. authentication, aka. authn). They are a secure and user-friendly alternative to traditional passwords.

    Passkeys provide a robust alternative to traditional passwords.

    With over 15 billion passkey-enabled accounts globally, the adoption is rapidly increasing.

    Organizations recognize the benefits of both improved security and user experience.

    Advantages include:

    Phishing Resistance: Passkeys are bound to specific domains, making them ineffective on fraudulent sites.

    User Experience: Passkeys streamline the login process, resulting in faster authentication and reduced cognitive load for users.

    Unique Credentials: Each service receives a distinct key pair, eliminating the risk of password reuse

    Automatic Strength: Keys exceed the strength of human-created passwords

    Reduced Social Engineering Risks: With no memorable secrets to extract, the potential for somebody to socially engineer your password is significantly diminished

    But passkeys face several implementation challenges:

    Device Dependency: A significant portion of enterprises (43%) cite the complexity of implementing passkeys due to device compatibility issues.

    Recovery Risks: Users risk losing access if all authenticated devices are lost, necessitating robust fallback protocols.

    Cross-Platform Gaps: Support for passkeys varies across ecosystems, particularly between Apple, Google, and Microsoft.

    Legacy System Inertia: Many organizations still rely on passwords, with 56% of enterprises continuing to use them even after adopting passkeys.

    Learning Curve: Everybody understands passwords, while passkeys (and the key management) are something new.

    This post delves into the benefits of passkeys, their mechanics, the adoption trends, and the challenges they present.

    1. TL;DR
    2. The Dichodomy of Security and Usability
      1. Phishing Resistance
      2. Preventing Poor Cyber Hygeine
    3. How Do Passkeys Work? The Tech Behind the Magic
      1. Registration Ceremony
      2. Authentication Flow
    4. Passkeys are Working: Adoption Trends You Need to Know
      1. Enterprise Adoption Trends
    5. Passkeys vs. Traditional MFA: The Showdown
      1. Defining Traditional MFA
      2. Simplifying Authn with Passkeys
      3. Improved Security Posture
    6. The Flip Side: Challenges and Limitations of Passkeys
    7. Looking Ahead: The Future of Passkeys in Authentication
      1. Upcoming Innovations in Passkey Technology
    8. In Conclusion: Embracing the Passkey Revolution

    The Dichodomy of Security and Usability

    Former FBI Director William H. Webster “There is always too much security until it is too little”

    Between professional life and personal life, we consistently use compute devices (phones, televisions, tablets, workstations, etc.). It’s near impossible to have your “guard up” every time you’re online.

    Passkeys improve user experience:

    Speed: Users experience significantly faster logins with passkeys. For example, Amazon users log in six times faster using passkeys than with traditional methods.

    Success Rate: According to a MSFT study, the success rate for passkey authentication is 98%, while traditional password methods struggle with a mere 32% success rate.

    Cognitive Load: Passkeys eliminate the need for users to manage passwords, reducing the cognitive burden associated with remembering and entering credentials (which explains the higher login success rate).

    Dashlane’s findings indicate that passkeys can lead to a 70% increase in conversion rates compared to password-based authentication, demonstrating their potential to enhance user engagement.

    Phishing Resistance

    We are all vulnerable to a well-crafted phishing attack. Sophisticated attackers use techniques that can fool even the most cyber savvy person while winding-down from a long day.

    The cryptographic architecture underpinning passkeys, binds credentials to specific web domains. This architecture prevents phishing attempts, as passkeys can only be used on legitimate sites. Whenever you authenticate, the passkey verifies the website’s authenticity before proceeding. This means that even if a your were somehow tricked into visiting a fraudulent site, the passkeys remain secure and unusable on that domain.

    This is a significant improvement over traditional passwords, which can be easily entered on phishing sites that look identical to real sites.

    Preventing Poor Cyber Hygeine

    Let’s admit it, the fantasy of a centralized and trusted provider that manages your identity across all online services is just that – a fantasy. Your place of work may have single sign on (SSO) and you may be using Google or Microsoft to for many personal sites, but there is always going to be a large number of platforms that aren’t integrated.

    This means you need to keep track of authentication credentials for hundreds, if not thousands, of different accounts (all belonging to you!)

    Passkeys address common problems with password management:

    Unique Credentials: Each service receives a distinct key pair, eliminating the risk of password reuse – I’m sure you’ve never reused a password

    Automatic Strength: Keys are generated to meet cryptographic standards, far exceeding the strength of human-created passwords – even those sites with nonsensical password complexity requirements

    Reduced Social Engineering Risks: With no memorable secrets to extract, the potential for somebody to socially engineer your password is significantly diminished

    How Do Passkeys Work? The Tech Behind the Magic

    The security of passkeys is rooted in asymmetric encryption, which involves the following key processes:

    1. Key Pair Generation: During registration, a unique public-private key pair is created. The public key is stored on the server, while the private key remains securely on the user’s device.

    2. Zero Secret Sharing: Authentication is performed through cryptographic challenges that utilize the private key, eliminating the need to transmit sensitive information. This means that even if a server is compromised, only non-sensitive public keys are at risk.

    This cryptographic approach makes brute-force attacks impractical, as private keys are never exposed and typically contain 256 bits of entropy, making them highly resistant to guessing.

    Passkeys utilize asymmetric cryptography to enhance security and streamline user workflows, fundamentally changing how authentication is performed.

    Registration Ceremony

    The registration of a passkey involves a series of steps that leverage the WebAuthn API. Here’s a simplified breakdown of the process:

    1. User Initiation: The user selects “Create Passkey,” which triggers the WebAuthn API.

    2. Retrieve Challenge: The website (more formally called the “Relying Party”) then provides a challenge. The challenge is a critical nonce value that guarantees the freshness, uniqueness, and cryptographic proof of the registration process.

    3. Key Generation: The authenticator (operating system, software key manager, or hardware security key) typically requests user verification. When confirmed the authenticator generates a unique public-private key pair, assigns an ID to the key (for later retrieval), and signs the challenge.

    4. **Public Key Storage: The service verifies the challenge and stores the public key along with key ID (this information is used during authentication).

    Authentication Flow

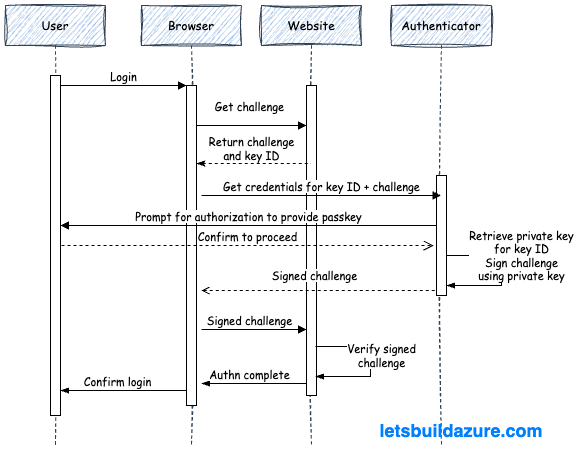
    The authentication process is similar to the registration ceremony, but uses information previously stored during registration:

    1. User Initiation: The user provides their username and triggers the authentication process.

    2. Service Challenge: The server returns a challenge (a cryptographic nonce) and key ID to the user’s device.

    2. Local Verification: The authenticator prompts the user for verification (biometric, PIN, etc.).

    3. Digital Signature: The authenticator then uses the stored private key (the one associated with the key ID) and signs the challenge, creating a unique signature.

    4. Server Validation: This signature is relayed to the server and the server uses the stored public key to verify the authenticity of the signature.

    This process is efficient, with reports indicating that passkey logins can be up to 70% faster than traditional password logins, significantly enhancing user experience.

    The rapid growth of passkey adoption is reshaping both consumer and enterprise authentication landscapes.

    Recent metrics indicate that over 15 billion passkey-enabled accounts exist globally, with significant uptake across major platforms. For instance, Google reports 800 million accounts utilizing passkeys, while Amazon has seen 175 million users adopt this technology within its first year of implementation.

    In the consumer sector, e-commerce leads the charge, with 42% of passkey usage attributed to improved checkout conversion rates. Air New Zealand experienced a 50% reduction in login abandonment after integrating passkeys, highlighting their effectiveness in enhancing user experience. Furthermore, Intuit has reported that 85% of its mobile authentications now occur via passkeys, underscoring a shift towards more secure and user-friendly authentication methods.

    A notable implementation of passkeys can be seen with CVS Health, which reported a 98% reduction in mobile account takeovers after adopting passkey technology. This dramatic decrease highlights the effectiveness of passkeys in mitigating security risks associated with traditional password systems.

    The enterprise sector is also witnessing a significant shift, with 87% of organizations now deploying passkeys. Key areas of focus include:

    Sensitive data access: 39% of enterprises prioritize securing sensitive information.

    Admin accounts: Another 39% emphasize protecting administrative access.

    Executive protection: 34% of organizations are focused on safeguarding executive accounts.

    Post-implementation statistics reveal substantial benefits:

    Lower Help Desk Costs: Organizations that adopt passkeys report a 77% reduction in help desk calls related to password issues. This not only saves costs but also enhances productivity by allowing IT teams to focus on more strategic initiatives.

    Long-Term Security Posture: As organizations increasingly adopt passkeys, they will benefit from a more secure authentication framework that is resilient against evolving cyber threats. This positions passkeys as a foundational element of future digital security strategies.

    Hybrid Deployment: Notably, 82% of enterprises are adopting hybrid deployments that combine device-bound and synced passkeys, reflecting a trend towards flexible security solutions.

    Passkeys vs. Traditional MFA: The Showdown

    Passkeys offer superior security and user experience compared to traditional multi-factor authentication (MFA).

    Defining Traditional MFA

    Before diving into a comparison of the of passkeys and MFA, let’s understand how MFA has been traditionally implemented.

    As the name implies, multi-factor authentication (MFA), involves authenticating with more than one factor…at least two factors (2FA):

    Something you know: This is your password or PIN

    Something you have: This is a physical device (like a smartphone or hardware token) and is the most popular second factor

    Something you are: These are biometrics (finger prints, facial recognition, voice recognition) – this is a touchy subject for data privacy advocates so tred cautiously and make sure you understand where these biometrics are being stored and processed.

    Simplifying Authn with Passkeys

    The net result of traditional MFA is a multi-step experience to authenticate. This can really annoy power-users trying to move fast and overwhelm the less technically capable. On the other hand, passkeys incorporate multiple factors (something you have and something your are) in a single transaction.

    Improved Security Posture

    MFA is not impervious to attacks. Recent years have seen several notable examples of MFA compromises, often exploiting human factors, technical weaknesses, or social engineering tactics.

    Cisco (2022): The Yanluowang ransomware group used MFA fatigue and voice phishing (vishing) to trick a Cisco employee into approving MFA requests. This allowed attackers to access Cisco’s corporate VPN and internal systems, leading to data theft and a ransomware threat. Reference

    Uber (2022): Attackers stole an Uber contractor’s credentials via malware on the contractor’s personal device, likely sold on the dark web. They then launched an MFA fatigue attack, repeatedly sending MFA approval requests until the contractor accepted one, granting access to multiple employee accounts. Reference

    Microsoft (2021-2022): The hacker group Lapsus$ used MFA fatigue attacks and social engineering to breach Microsoft’s internal systems, gaining access to employee and high-privilege accounts, including source code repositories for projects like Bing and Cortana. Reference

    **MGM Resorts (2023):** Attackers used social engineering to bypass MFA by calling the service desk and convincing agents to reset passwords without proper verification, enabling ransomware deployment. Reference

    SEC Twitter Accounts (2023): Attackers used SIM swapping to hijack phone numbers associated with accounts lacking MFA protection, then reset passwords to take control of official Twitter accounts. Reference

    How do they do this? There are several popular techniques:

    MFA Fatigue (MFA Bombing): Attackers flood users with repeated MFA approval requests, hoping to wear them down until they approve one. This tactic was used against Cisco, Uber, and Microsoft employees.

    Service Desk Social Engineering: Attackers impersonate users calling help desks to reset passwords or enroll new MFA devices, bypassing MFA protections.

    Adversary-in-the-Middle (AITM) Attacks: Phishing pages mimic legitimate login and MFA prompts, capturing credentials and MFA codes in real time to access accounts.

    Session Hijacking: Attackers steal session tokens or cookies after MFA authentication to maintain access without repeated MFA challenges.

    SIM Swapping: Criminals hijack phone numbers to intercept MFA codes sent via SMS or calls, as seen in attacks on SEC Twitter accounts.

    Malware and Endpoint Compromise: Malware on user devices can steal credentials or session tokens, enabling attackers to bypass MFA.

    **To be clear, I am not saying MFA should be dropped, but I am saying passkeys provide a more robust alternative**

    The Flip Side: Challenges and Limitations of Passkeys

    Implementing passkeys introduces significant challenges, particularly concerning device dependency and recovery risks. While passkeys enhance security and user experience, they also create new vulnerabilities that organizations must address.

    Device dependency is a primary concern. Passkeys are tied to specific devices, meaning that if a user loses their device or it becomes inoperable, they may lose access to their accounts. According to a report by FIDO, 43% of enterprises cite implementation complexity due to this device dependency, which complicates user access and recovery processes. Users must ensure they have backup devices or recovery methods in place, which can be cumbersome and may lead to frustration.

    Recovery risks are another critical issue. If all devices associated with a passkey are lost, users face the daunting task of account recovery. Unlike traditional passwords, which can often be reset through email or SMS verification, passkeys require a more complex recovery process. This can involve fallback protocols that may not be straightforward or user-friendly. For instance, if a user loses their primary device and does not have a secondary device set up for recovery, they may be locked out of their accounts entirely.

    Additionally, cross-platform compatibility poses challenges. While major platforms like Apple, Google, and Microsoft support passkeys, the implementation can vary significantly across different ecosystems. This inconsistency can lead to user confusion and hinder widespread adoption. Organizations must navigate these discrepancies to ensure a seamless user experience, which can be resource-intensive.

    Moreover, legacy systems present another barrier. Many enterprises still rely on traditional password systems, with 56% of organizations reporting continued password usage even after transitioning to passkeys. This inertia can slow down the adoption of passkeys and complicate the integration of new authentication methods.

    Looking Ahead: The Future of Passkeys in Authentication

    Passkeys are set to redefine digital security by addressing vulnerabilities inherent in traditional password systems. As organizations increasingly adopt passkeys, innovations are emerging that promise to enhance security and user experience further.

    The current landscape shows a significant shift towards passkey adoption, with 92.7% of devices now passkey-ready and enterprise deployments increasing by 14 percentage points since 2022. This growth is driven by the need for stronger security measures against phishing and credential theft, which account for 72% of breaches. The FIDO2 standard, which underpins passkey technology, is becoming the industry norm, pushing organizations to transition from legacy password systems.

    Upcoming Innovations in Passkey Technology

    1. **Decentralized Recovery Solutions**: Future innovations may include blockchain-based key escrow systems that allow users to recover their passkeys without relying on centralized services. This could mitigate risks associated with losing access to authenticated devices.

    2. **IoT Integration**: The FIDO Device Onboard specification aims to extend passkey functionality to Internet of Things (IoT) devices. This will enhance security across a broader range of devices, ensuring that smart home technologies and other connected devices can leverage the same robust authentication methods.

    3. **Quantum Resistance**: As quantum computing advances, the need for post-quantum cryptographic algorithms becomes critical. Future passkey implementations may incorporate these algorithms to safeguard against potential quantum attacks, ensuring long-term security.

    4. **Enhanced User Experience**: Innovations will likely focus on streamlining the user experience further. For instance, integrating biometric authentication seamlessly into everyday devices can reduce friction while maintaining high security.

    5. **Cross-Platform Compatibility**: As passkeys gain traction, efforts to standardize their implementation across different platforms (Apple, Google, Microsoft) will be crucial. This will facilitate smoother transitions for users and organizations adopting passkey technology.

    In Conclusion: Embracing the Passkey Revolution

    The transition to passkeys marks a pivotal moment in digital security, offering a robust alternative to traditional passwords. Passkeys leverage public key cryptography, providing enhanced phishing resistance and a streamlined user experience. With over 15 billion passkey-enabled accounts globally, organizations are witnessing significant improvements in security metrics and user satisfaction.

    Factor Passkeys Traditional Passwords
    Phishing resistance ✅ Native, origin-bound ❌ Vulnerable to phishing
    Sign-in success rate 98% 32%
    User experience Faster logins, reduced cognitive load Slower, requires password management

    As the adoption of passkeys continues to grow, organizations should prioritize their implementation to enhance security and improve user engagement. Embracing this technology is not just a trend; it is a necessary step towards a more secure digital future.

    As the adoption of passkeys continues to surge, challenges remain, including device dependency and recovery risks. However, the trajectory indicates a strong shift towards passkeys as the standard for secure digital identity. With ongoing innovations and increasing regulatory pressures, the future of authentication is likely to be dominated by passkeys, offering both enhanced security and improved user experiences.

  • Making AI Assistants More Capable with Model Context Protocol (MCP)

    TL;DR

    The Model Context Protocol (MCP) is an open-source standard that simplifies integrating AI assistants with tools (the things AI assistants use to perform actions) and data sources (the locations AI assistants go to for information).  With so much momentum behind it, MCP is poised to become the standard for AI-to-tool interactions; paving the way for more intelligent and responsive AI applications.

    This article expands on these capabilities with an concrete example of a food ordering AI assistant.

    – Model Context is the surrounding information — like conversation history, user preferences, goals, and external data — that AI models use to generate more relevant and coherent responses.

    – Model Context Protocol (MCP) is a standard that helps AI agents efficiently interact with data sources and external tools without needing a custom integration for every single one.

    – Without MCP, building AI agents requires tedious, high-maintenance integrations. MCP streamlines this by creating reusable connections across apps and data.

    – Challenges remain: MCP still has issues with authentication, security (blind trust risks), cost control (token usage), and protecting sensitive data.

    MCP isn’t perfect yet, but it’s a big step toward more powerful, context-aware AI systems that are easier and faster to build.

    1. TL;DR
    2. What is Model Context?
    3. How Does MCP Help? A Real-World Example
      1. Situation and Background
      2. No AI Agent – A Familiar Flow
      3. AI Agent Doing the Work
      4. How MCP Helps You Build Agents More Effeciently
      5. Avoiding the MxN Integration Problem
    4. Are You Saying Framework Tools Are Bad?
      1. That Settles It, MCP Will Take on the World
      2. Authentication and Authorization (authn/authz)
      3. Blind Trust
      4. Lack of Cost Controls
      5. Unwitting Data Exposure
    5. In Conclusion: Do Not Ignore MCP

    What is Model Context?

    Before nerding out on the protocol itself, let’s understand what context is and how it applies to different AI models with different modalities (ex. language models, vision models, audio models, or models that support more than one of these modalities).

    According to Merriam-Webster, context is “the parts of a discourse that surround a word or passage and can throw light on its meaning” or “the interrelated conditions in which something exists or occurs.”

    In the world of AI, this translates to the surrounding information—textual, visual, auditory, or situational—that informs and shapes the model’s response. Each model type uses context in different ways depending on the modality and the problem being solved. 

    Model context is the information a language model uses to understand the user’s intentions and provide relevant, coherent responses. This includes:

    Conversation History: Previous prompts and responses.

    User Preferences: Style, tone, depth of answers.

    Task Goals: Long-term objectives and/or short-term instructions.

    External Data Repositories: Files, websites, document libraries, or other repositories.

    How Does MCP Help? A Real-World Example

    The Model Context Protocol (MCP) unifies how AI systems perform actions and interacts with data repositories.

    Let’s walk through a real-world example so you can understand where exactly MCP fits in. First, I’ll walk through the process without AI, then I’ll talk through the process with an AI agent.

    Situation and Background

    For this example, let’s assume your planning dinner for you and a friend. It’s been a while since you’ve eaten at your favorite Indian restaurant. Chicken tikka, rice, and naan bread are your go-to dishes there, but you know that won’t be enough for the both of you, so you’ll need to figure out another dish when you get there…on second thought, you want delivery and, being a digital native, you’ll place your order online (DoorDash, GrubHub, UberEats, etc.) to arrive by 6:30p.

    No AI Agent – A Familiar Flow

    Without an AI agent, you’ll go through a process similar to below:

    1. Log into your preferred food delivery service

    2. Search for the restaurant.

    3. Add your favorite items to the cart

    4. Examine comments and reviews about the restuarant to figure out other popular dishes

    5. Select a dish with positive reviews (samosas!)

    6. Set time for delivery and complete check-out

    Many things happen behind the scenes, we won’t focus on how those processes may or many not leverage AI, and food arrives before you get “hangry”.

    AI Agent Doing the Work

    If you had a full-blown agent, something similar to the above would happen based on a single command:

    “Order food from my favorite Indian restuarant. Get my usual items and surprise me with a popular dish. I need the food delivered to my house by 6:30p”

    The agent will then perform roughly the following sequence:

    1. Think about the set of actions requried to fulfilled the request

    2. Determine it needs to more context (ex. what is your favorite Indian resturant? what do you typically order there?)

    3. (data) Examine chat history and personal preferences to determine your favorite restuarant: Tandoori Oven

    4. (data) Examine chat history and personal preferences to determine your home address

    5. (data) Examine chat history and personal preferences to determine your preferred food delivery service

    6. (data) Examine your order history to determine what you typically order: chicken tikka, rice, garlic naan

    7. (data) Examine reviews of the restuarant to see what is popular: samosas

    8. (tools) Add items to cart

    9. (human in the looop) Confirm the order before placing it

    10. (tools) Checkout and set delivery to your house by 6:30p

    I intentionally tagged the steps where the agent is accessing data and using tools; it’s these steps that can leverage MCP…let’s see how.

    How MCP Helps You Build Agents More Effeciently

    What if you were tasked with making the above agent? How would you build it?

    It’s very possible to create the above agent without using MCP at all. Many of the popular agentic frameworks include an inventory of built-in “tools” (or sometimes called “functions” or “skills”) that improve memory management and allow models to interact with external services.

    * LangChain/LangGraph

    * Autogen

    * Crew.ai

    * OpenAI Swarm

    * Hugging Face Transformers Agents

    * etc.

    At time of this writing, none of those frameworks provide the capability to interact with any of the food delivery services (DoorDash, GrubHub, UberEats, etc.)…sure you could design things to interact with those sites using a browser (ex. BrowserUse) but the results won’t be as concise and you may want (and it’s a lot more testing and debugging).

    What about building a custom tool for the framework?

    You could examine the APIs these delivery services provide and create a custom tool (you could even use AI itself to build this tool)…but don’t underestimate the ongoing testing and maintenance required to accomodate changes to the APIs (which will certainly change over time).

    Avoiding the MxN Integration Problem

    The above quandry about creating a custom tool is a major motive for MCP’s introduction.

    “M” AI applications need to connect to “N” data sources, leading to an exponential increase in custom integrations (MxN).

    However, if there was an MCP server that knows how to manage your personal preferences and one that interacts with the food delivery services, it sure would simplify the process…and reduce maintenance.

    Are You Saying Framework Tools Are Bad?

    No, built-in tools will always have a place. They can be tuned for speed and token reduction (less back and forth chatter). But, as MCP implementations become more prevalent and mainstream (not just side-projects but actual vendor supported services) you’ll see a shift from framework based tools towards MCP based designs.

    That Settles It, MCP Will Take on the World

    Not yet, there are still some shortcomings that the MCP specification needs to work through.

    Authentication and Authorization (authn/authz)

    In the above example, I glossed over the fact that the AI agent needs to interact with the food delivery services as you…the person with the account and payment information. The initial revision of the MCP spec didn’t address this. Now that they have, there are still some shortcomings to the design (which Christian Posta dives into details on)

    Blind Trust

    Many of the MCP server implementations are susepetible to command injection vulnerabilities. If you are only consuming these servers (not creating them) it’s not a major concern right? Until you find yourself running those servers locally (on your laptop or cloud machines) and you see the agent is taking harmful actions (whether intentionally or just because it’s spiraling down the wrong course of thinking).

    Lack of Cost Controls

    The quality of MCP servers vary and, unlike custom tools, it’s easy for the server developer to return large amounts of text in responses. During the course of a dialog between the model and the server, the history of the text can add up (resulting in large token consumptions and larger costs for agent execution)

    Unwitting Data Exposure

    Similar to the Blind Trust problem, and related to the authn/authz shortcomings, an MCP server implementation may return data that you (and the agent acting on your behalf) shouldn’t have access too.

    In Conclusion: Do Not Ignore MCP

    Model Context Protocol (MCP) isn’t a magic wand that instantly solves every challenge in building smarter, more capable agents — but it is a major leap forward. By standardizing how models interact with data and tools, MCP drastically reduces the complexity of integrations and helps avoid the dreaded MxN problem.

    As MCP matures, expect to see faster development cycles, better interoperability between AI systems, and a shift toward more modular, maintainable designs. But, as we explored, MCP isn’t without its growing pains: security concerns, cost management, and responsible data access will remain critical issues for practitioners and vendors to address.

    The bottom line? MCP is setting the foundation for a new era of AI agents — one where context is richer, actions are more reliable, and developers spend more time building value and less time gluing systems together. Stay curious, stay cautious, and get ready: the next wave of AI innovation is just getting started.

  • Chain of Thought Prompting

    TL;DR

    Chain-of-Thought (CoT) prompting is a technique that enhances reasoning in large language models by guiding them to generate intermediate logical steps before providing final answers. It’s most effective for complex tasks requiring multi-step reasoning, particularly in models with over 100 billion parameters. Use CoT when dealing with mathematical problems, symbolic manipulation, or complex reasoning tasks where step-by-step thinking would be beneficial. Learn more.

    1. TL;DR
    2. What is Chain-of-Thought Prompting
    3. Key Benefits
      1. Enhanced Reasoning Capabilities
      2. Performance Improvements
    4. Research Findings
      1. Effectiveness Factors
      2. Notable Results
    5. Best Practices
      1. Implementation Guidelines
      2. Limitations

    What is Chain-of-Thought Prompting

    Chain-of-Thought prompting works by providing examples that demonstrate explicit reasoning steps, encouraging the model to break down complex problems into manageable intermediate steps. Unlike traditional prompting that seeks direct answers, CoT guides the model through a logical thought process, making it particularly effective for tasks requiring structured thinking. Learn more.

    Key Benefits

    Enhanced Reasoning Capabilities

      • Allows models to decompose multi-step problems into intermediate steps
      • Provides interpretable insights into the model’s reasoning process
      • Enables additional computation allocation for more complex problems. Learn more.

      Performance Improvements

      • Significantly improves accuracy on arithmetic reasoning tasks
      • Enhances performance on commonsense reasoning problems
      • Facilitates better symbolic manipulation. Learn more.

        Research Findings

        Effectiveness Factors

        • Performance gains are proportional to model size, with optimal results in models of ∼100B parameters[1]
        • The specific symbols used in prompts don’t significantly impact performance, but consistent patterns and web-style text are crucial[2]
        • Complex examples with longer reasoning chains tend to produce better results than simpler ones[5]

        Notable Results

        • Achieved state-of-the-art accuracy on the GSM8K benchmark of math word problems using just eight CoT exemplars[3]
        • Demonstrated improved performance across arithmetic, commonsense, and symbolic reasoning tasks[6]
        • Shows particular strength in mathematical and symbolic reasoning tasks, though benefits may vary in other domains[4]

          Best Practices

          Implementation Guidelines

          • Use detailed, step-by-step reasoning examples in prompts
          • Focus on complex examples that showcase multiple reasoning steps=
          • Maintain consistent patterns in example structure[5]

            Limitations

            • May not be effective with smaller language models
            • Benefits primarily concentrated in specific types of reasoning tasks
            • Performance improvements may vary depending on the task type[4]

              Citations:

              [1] https://learnprompting.org/docs/intermediate/chain_of_thought

              [2] https://openreview.net/forum?id=va7nzRsbA4

              [3] https://openreview.net/forum?id=_VjQlMeSB_J

              [4] https://arxiv.org/html/2410.21333v1

              [5] https://learnprompting.org/docs/advanced/thought_generation/complexity_based_prompting

              [6] https://arxiv.org/abs/2201.11903

              [7] https://openreview.net/pdf?id=_VjQlMeSB_J

              [8] https://arxiv.org/pdf/2201.11903.pdf

            • GitHub Copilot for Azure: How It Helps AKS Admins

              TL;DR

              GitHub Copilot for Azure is now in public preview.  I was given early access and have been using it for a few months already. It has surprised me in many ways and disappointed me in others.

              When it comes to Azure Kubernetes Service (AKS) administrative tasks, the extension clearly earns “navigator” title; but don’t rely on it to take action in the same way a pilot would depend on a “copilot” (at least not yet).

              This article includes a summary of things that exceeded expectations, met expectations, and left me wanting more when it comes to AKS administrative tasks. Give it a review to see how it may inspire you with better prompts or to perform other actions.

              What worked well?

              • Summarize trade-offs between AKS and a self-managed Kubernetes cluster
              • Explain motivations to use service-mesh
              • Create AKS cluster for development
              • Describe quota adjustments required to deploy an AKS cluster in your subscription
              • Locate a sample application to deploy to AKS cluster
              • Create Helm Chart from collection of YAML Manifests

              What did not work so well?

              • Adjust CPU quotas to deploy an AKS cluster
              • Deploy the sample application
              • Analyze health of a service running on my AKS cluster
              • Enable Istio service mesh on the cluster
              • Generate kubeconfig to connect to my cluster
              1. TL;DR
                1. What worked well?
                2. What did not work so well?
              2. What is GitHub Copilot for Azure anayways?
              3. How to Setup The Extension
              4. (Not So) Hypothetical Scenarios
                1. Exploring Topics
                  1. @azure How does the management and maintenance differ between AKS and a self-managed Kubernetes cluster?
                  2. @azure What are the motivators of service mesh and why would I enable it on my AKS cluster?
                  3. @azure What are the specific prerequisites for deploying an AKS cluster in the eastus2 region?
                2. Deploy Something to Get Hands-On
                  1. @azure create an AKS cluster
                  2. @azure I am receiving the below error when deploying and AKS cluster. Which quotas do I need to increase?
                  3. @azure what quota setting do these VM skus belong to?
                  4. @azure increase cpu quota in the eastus2 region for standard_d4ds_v5?
                  5. @azure does my subscription meet the prerequisites for deploying and AKS cluster to eastus2 region?
                  6. @azure Can you find a sample app that consist of multiple micro-services to deploy to AKS?
                  7. @azure deploy this app to Azure
                  8. @azure deploy this manifest to my aks cluster
                3. Examining Health of Deployed Services
                  1. @azure how is the health of the order-service on my aks cluster named copilot?
                4. Let’s Setup Service Mesh
                  1. @azure enable istio on my aks cluster named “copilot”
                  2. @azure generate kubeconfig connecting to my AKS cluster named “copilot”
                5. Phone a Friend
                  1. Convert these yaml manifest files into a helm chart

              What is GitHub Copilot for Azure anayways?

              This extension to GitHub Copilot allows you to perform a range of Azure activities, directly within VS Code

              • Learn – Chat with expert assistants tuned on Azure topics, training, and documentation.
              • Deploy – Update and create resources; locate and provision solution accelerators.
              • Review – Query your Azure resources using plain English.
              • Diagnose – Navigate and interpret logs to understand the problem.

              How to Setup The Extension

              For full details on how to get yourself going with this extension, and even execute some of these prompts, see my article GitHub Copilot for Azure: The End-to-End Setup Process

              (Not So) Hypothetical Scenarios

              I’ve been using this extension for a lot of different things in recent months. It’s helpful, but you still need to know what you want to do and perform a lot of the actions yourself.

              Exploring Topics

              The GitHub Copilot for Azure extension does a good job explaining Kubernetes concepts, AKS specific things, and reiterating best-practice guidance. This is a huge help when you’re completely new or if you are well-versed, but just can’t find the right words.

              @azure How does the management and maintenance differ between AKS and a self-managed Kubernetes cluster?

              Great explanation!

              @azure What are the motivators of service mesh and why would I enable it on my AKS cluster?

              Another good answer and helpful links to additional reference material.

              @azure What are the specific prerequisites for deploying an AKS cluster in the eastus2 region?

              Provides general guidance, but nothing particularly actionable or tactful.

              Deploy Something to Get Hands-On

              At this point, I wanted to go from discussion and theory to get something actually running.

              @azure create an AKS cluster

              This launched a nice experience to deploy an basic AKS cluster using the AKS extension for VSCode. Unfortunately, the process failed due to CPU quota restrictions (a common problem I was hoping the prompt about pre-requisites would have made clear).

              @azure I am receiving the below error when deploying and AKS cluster. Which quotas do I need to increase?

              Invalid template: BadRequest: Preflight validation check for resource(s) for container service copilot made this in resource group aks-rg failed. Message: AKS Automatic could not find a suitable VM size. The subscription may not have the required quota of '16' vCPUs, may have restrictions, or location 'eastus2' may not support three availability zones for the following VM sizes: 'standard_d4pds_v5,standard_d4lds_v5,standard_d4ads_v5,standard_d4ds_v5,standard_d4d_v5,standard_d4d_v4,standard_ds3_v2,standard_ds12_v2'.

              Quotas can be confusing. The concept is easy to understand, but when you get into the details about the different SKU families and regions, it can be daunting. The response was pretty vague, so I decided to press the issue further…

              @azure what quota setting do these VM skus belong to?

              standard_d4pds_v5
              standard_d4lds_v5
              standard_d4ads_v5
              standard_d4ds_v5
              standard_d4d_v5
              standard_d4d_v4
              standard_ds3_v2
              standard_ds12_v2

              The response reiterated the vCPUs and memory for each of those models, but it wasn’t quite what I was hoping for.

              @azure increase cpu quota in the eastus2 region for standard_d4ds_v5?

              Building on the response from the prior question, I was expecting the extension to actually submit the quota increase request for me. Unfortunately, I was provided with a CLI command I could run to examine the quotas and link to external documents that provided instructions on how to navigate the quota increase process. I then made the quota increases myself and decided to give the extension another chance to prove itself.

              @azure does my subscription meet the prerequisites for deploying and AKS cluster to eastus2 region?

              Disappointing response here. Basically I was told there was no existing AKS cluster in the subscription. Well I knew that! This whole journey started because I wanted to create a cluster.

              When all was said and done, I relaunched the AKS Extension in VSCode and worked through the wizard to create my cluster.

              @azure Can you find a sample app that consist of multiple micro-services to deploy to AKS?

              Copilot located the example Azure-Samples/aks-store-demo: Sample microservices app for AKS demos, tutorials, and experiments and provided azd commands for me to run to easily initialize workspace.

              The “human in the loop” strategy that is popular with AI Assistants would have prompted me to confirm action and then proceeded. In this case, no such prompt so I used the “Insert into Terminal” feature to run the recommended commands myself.

              Once the workspace was initialized with the sample application…

              @azure deploy this app to Azure

              Not the response I was hoping for. I was given links to different online instructions for deploying the application…but I noticed a template spec yaml and opened that in my editor.

              @azure deploy this manifest to my aks cluster

              This worked out well. It launched wizard and I deployed aks-store-quickstart.yaml

              Examining Health of Deployed Services

              With the services defined in the manifest now deployed, I wanted to see what kind of help Copilot could provide for diagnosing problems.

              @azure how is the health of the order-service on my aks cluster named copilot?

              This resulting in some recommended kubectl commands. No execution of those commands and no interpretation of the results. Very helpful for those unfamiliar with kubectl.

              A major benefit of AKS is you can examine the cluster configuration through the Azure portal (assuming the cluster management plane is exposed to the internet). That is much more user friendly than kubectl from the command line and I would have expected a “head-nod” to these capabilities…but no mention.

              Let’s Setup Service Mesh

              With the AKS cluster running and a sample collection of services deployed, I wanted to take advantage of the benefits that “service mesh” promised during my prior testing.

              @azure enable istio on my aks cluster named “copilot”

              This returned instructions how install Istio, but did not take an action or prompt me to confirm action. I was actually surprised that the response did not reference the Istio add-on for AKS: Deploy Istio-based service mesh add-on for Azure Kubernetes Service – Azure Kubernetes Service | Microsoft Learn

              Regardless, I decided to proceed with the instructions provided (which basically explained how to deploy Istio via Helm charts).

              First things first…I need to connect to the cluster.

              @azure generate kubeconfig connecting to my AKS cluster named “copilot”

              At this point, I was not disappointed. My expectations for Copilot to take action where minimal. The response provided az cli command to run (and it worked flawlessly)

              az aks get-credentials --resource-group aks-rg --name copilot

              Then I completed the Istio deployment sequence previously described without problems.

              Phone a Friend

              An engineer on the team was having trouble managing a complex suite of services in their cluster (YAML manifest overload). Not deeply familiar with Helm syntax myself, I decided to see how Copilot could help.

              Convert these yaml manifest files into a helm chart

              I was very pleased with the results! This is definitely a scenario to keep in mind and save hours of work. The content was automatically generated, placed in my editors, and I saved the files in my workspace.

              Of course, we tested it out and things ran….helm deploy with success.

            • GitHub Copilot for Azure: The End-to End Setup Process

              1. TL;DR
              2. A More Detailed Description

              TL;DR

              GitHub Copilot for Azure is a GitHub Copilot extension; assisting with all things related to Azure cloud. To use it, perform the following:

              1. Create Azure account; your identity needs access to at least one subscription
              2. Confirm Azure Copilot is enabled (it’s enabled by default)
              3. Create account on GitHub.com
              4. Enable GitHub Copilot for your GitHub.com account
              5. Install VS Code (or start a GitHub Codespace)
              6. Install “GitHub Copilot for Azure” extension
              7. (optional) Install other VS Code extensions to improve Azure effeciency
              8. Sign into your Azure account with “GitHub Copilot for Azure”
              9. Get familiar with GH Copilot and the “for Azure” extension

              A More Detailed Description

              1. Obviously, you need an Azure account with access to a subscription. If you are reading this blog, you probably have one, but you can always Try Azure for free
              2. Make sure Azure Copilot is enabled on your tenant. This is enabled for all users by default, but your tenant administrator may have disabled this. If that is the case, you need to contact them and request the enable it for your identity.
                • Log into Azure Portal
                • At the top of each page, there is an omni-search bar (G + / is keyboard shortcut). Next to the search field, there is a “Copilot” icon – click that.
                • A pane will open (on the right side). As long as this doesn’t say something like “You don’t have access to Copilot” you are in business.
              3. Create a GitHub.com account (or log into your existing account)
              4. Enable GitHub Copilot for your GitHub.com account (30-day trial or purchase)
              5. Install VS Code on your local system or launch a Codespace on GitHub.
              6. Visit Extensions Marketplace, find, and install “GitHub Copilot for Azure
              7. This automatically installs a required dependencies (like GitHub Copilot Chat)
              8. (optional) If you frequently use VS Code and Azure, consider related extensions. Personally, I have found the list below helpful – but it really depends on the kind of activities you perform in Azure (don’t be tricked! check the extension publisher):
                • Azure Tools (which installs a collection of Azure related extensions)
                • Azure Machine Learning
                • Azure IoT Hub
                • Azure Kubernetes Service
                • Azure API Management
                • Azure Automation
                • Azure Policy
                • Azure Pipelines
                • Azure Terraform
                • Bicep
              9. This first time you use GHCP4AZ, it will ask you to sign into Azure. If you belong to multiple tenants, you need to select a single tenant. You can always change this tenant by running @azure /changeTenant in the Copilot Chat window or performing the click sequence in Set your default tenant.
              10. If you haven’t used GitHub Copilot before take a look at Microsoft’s free Introduction to GitHub Copilot mini-course (it is worth the few minutes) and review other postings specifically about using GitHub Copilot for Azure.
            • Handle MSFT’s MFA Mandate With Confidence

              TL;DR

              You can mess up your entire company if you hastily react to Microsoft’s mandate for multifactor authentication (MFA). If you aren’t ready by October 15, 2024:

              But is this really required? “Yes…there are no exceptions” per the Mandatory MFA FAQs

              1. TL;DR
              2. This Is Just the Beginning
                1. Phase 1 Impact
                2. Phase 2 Impact
              3. What is an Entra tenant?
              4. Which Kind of Accounts are Impacted?
                1. Member and Guest User Accounts
                2. Shared Accounts
                3. Service Accounts
                4. “Break Glass” Accounts
              5. Which Kind of Accounts are Not Impacted?
                1. Service Principals, App Registrations, and Enterprise Apps
                2. Managed Identities
              6. But How Do I Address Potential Problems
                1. Service Accounts
                2. “Break Glass” Account
                3. Member and Guest Accounts
              7. In Closing

              This Is Just the Beginning

              I suspect somebody at Microsoft was fed up with being blamed for breaches caused by customers misconfiguring their own environments. The MFA requirement is one of several “best practices” that MSFT is now requiring all customers adhere to. For another example, see my post about private subnets.

              No more Mr. Niceguy…but it really is for you own good

              The MFA mandate is spread across multiple phases (two announced so far, but you should expect more). Phase 1 and Phase 2 impacts power-users (admins, cloud developers, etc.); everyday users don’t use these services and will not be impacted by Phase 1 or Phase 2 mandate.

              Phase 1 Impact

              Phase 2 Impact

              • Azure CLI
              • Azure Powershell
              • Azure API clients (like Terraform)

              Congratulations! if you use any of the above services, you are a power-user (even if you just have Reader permissions).

              What is an Entra tenant?

              Not sure what an Entra tenant is? All Microsoft cloud products are tied to a tenant. If your company uses any of these clouds, they have at least one tenant.

              • Azure cloud (and Azure DevOps)
              • M365 (Office, Teams, Sharepoint, OneDrive, Intune, etc.)
              • D365 (CRM, ERP)
              • Power Platform (Power BI, Power Apps, etc.).

              According to Bing Copilot…”describe an Entra tenant to me”

              A Microsoft Entra tenant is essentially a dedicated instance of Microsoft Entra ID (formerly Azure Active Directory) that an organization uses to manage its users, groups, and resources. Here are some key aspects:

              • Identity Management: It provides a centralized platform for managing user identities, including employees, partners, and customers.
              • Access Control: Entra tenants allow you to control access to applications and resources through policies and role-based access control (RBAC).
              • Security: Features like multi-factor authentication (MFA), conditional access policies, and identity protection help secure user accounts and data.
              • Collaboration: Supports B2B collaboration by allowing guest users from other organizations to access resources securely.
              • Integration: Can be integrated with various identity providers and applications to streamline authentication and single sign-on (SSO).

              Which Kind of Accounts are Impacted?

              Member and Guest User Accounts

              This mandate applies to all “user” accounts in your Entra tenants, regardless of type.

              Member accounts are user identities that belong to the Entra tenant. These accounts are “homed” to the Entra tenant they are a member of. It’s common to setup synchronization between your on-prem Active Directory using Entra Connect. Accounts created by this synchronization are considered Member accounts.

              Guest accounts are external user identities registered with the Azure tenant. It is very common to setup a B2B trust between your Entra tenant and a third party’s trusted identity provider (IdP). Guest accounts may be “homed” in another Azure tenant or they may be “homed” in a completely separate IdP platform (such as Okta or Ping Federate).

              Shared Accounts

              With the exception of “break glass” accounts, discussed later, this is not a recommended practice.

              User accounts should be assigned to individuals only…but the reality is there are common accounts used by a group or team that shares the credentials. This brings a problem of reduced traceability and individual accountability.

              This mandate applies to shared accounts (since they are really just “user” accounts assumed by multiple individuals).

              Service Accounts

              The term “service account” is not the same as a Service Principal (which is discussed later). I am using “service account” to describe those situations where you have automated processes interacting with Entra, Azure, or other Microsoft Cloud apps as a “User”.

              Like all User accounts, service accounts will be impacted.

              “Break Glass” Accounts

              Break glass accounts are Member accounts with tightly managed credentials. Similar to a shared accounts, the credentials of a “break glass” account are shared amongst a small group or team. Unlike shared accounts, the “break glass” account is only used in emergency situations – they are critical to prevent you from getting locked out of your tenant.

              These accounts are subject to the same MFA requirement as all other User accounts.

              Which Kind of Accounts are Not Impacted?

              Service Principals, App Registrations, and Enterprise Apps

              These three entities are often confused. When you setup an App Registration or an Enterprise App, an associated Service Principal is created in your Entra tenant. The Service Principal is the identity that the App Reg or Enterprise App uses when interacting with your tenant, Azure resources, or other Microsoft Cloud elements.

              To make a long story short, Service Principals are not impacted by this mandate; neither are the App Registrations nor the Enterprise Apps.

              Managed Identities

              Managed identities are very similar to Service Principals, but they can only be used by workloads running in Azure. Behind the scenes, Managed Identities have a Service Principle but, unlike a Service Principle, you do not control the authentication keys and certificates used by these non-human identities (they are managed by Microsoft).

              Managed identities are not impacted by this mandate.

              But How Do I Address Potential Problems

              Mandatory Microsoft Entra multifactor authentication (MFA) – Microsoft Entra ID | Microsoft Learn provides good guidance on the actions to prepare for mandatory MFA. I am summarizing points from that article here.

              Service Accounts

              If you know about specific service accounts in use, migration them to use a workload identity (a Service Principal or Managed Identity) so you secure your cloud-based service accounts.

              Entra sign-in logs can help you identify the service accounts failing MFA and the Export-MSIDAzureMfaReport generates a helpful report to see which accounts are not using MFA. Once you have enabled the MFA CAP, you’ll quickly see which accounts are repeatedly failing the MFA criteria.

              Don’t feel too bad if some of the automation using these accounts temporarily breaks – it should have never been setup like this to begin with.

              “Break Glass” Account

              Microsoft Authenticator is not an ideal method for MFA of this kind of account because you can only associate it with one phone. When problems occur, you don’t want to depend on a single individual to log in.

              For smaller organizations, you can create separate break glass accounts for each individual and they can register their own phone.

              But for larger organizations, this can be unwieldy so enable FIDO2 passkeys for your organization and get the various individuals that may need to use this account setup BEFORE you create a Conditional Access Policy requiring MFA. Certificate-based authentication is another method to setup multiple individuals with MFA ability using the break glass account.

              Regardless of the approach (individual break glass accounts or a shared account) it’s important to monitor sign-in and audit logs so you’re alerted whenever one of the break-glass accounts is used. This alert can be email and/or SMS and/or Team message (or all of those). These are powerful accounts and you want to watch them closely.

              Member and Guest Accounts

              If you don’t plan on using one of the Entra’s built-in MFA methods then you need to configure an external authentication method.

              Entra Conditional Access Policies (CAPs) are very powerful but also rather straight-forward. You can configure a wide variety of criteria to secure your tenant and the cloud applications using your tenant for authentication.

              At a minimum, you should create a CAP requiring MFA for anybody accessing the Cloud app “Microsoft Admin Portals” – this covers more than the Phase 1 applications that require MFA, but if you are going through this process, you might as well get ahead of the curve.

              It’s a good practice to Exclude certain users or groups when you create a new CAP – this prevents you from locking yourself out if something was misconfigured. Be sure to include some of the other Entra admins in this CAP so they can test their access.

              Review the Entra sign-in logs to of somebody involved in the test to ensure the MFA CAP was applied to their sign-in attempt. Once verified, you can remove yourself from the exclusion.

              In Closing

              Over and over again, MFA is a proven method to improve your security posture. Ideally, you implement MFA for all of your cloud apps, but Microsoft is leaving you no choice but to implement MFA for the sensitive admin apps used to manage a variety of their popular cloud based services.

              More details to come around the changes required to handle potential problems with the Phase 2 changes. Implement the changes described in this article and you’ll have much less to worry about when that time comes.

            • Private Subnets: Don’t Let Your VM Get Trapped

              TL;DR

              Starting September 30, 2025, your VMs will be blocked from the public Internet, unless you have outbound controls in place. This means:

              • no pulling updates from public package repositories
              • no pulling containers from public registries
              • no pushing telemetry to monitoring tools
              • no making calls to third-party APIs
              • etc., etc.

              Avoid this surprise. Understand your options and the trade-offs between them.

              1. TL;DR
              2. In The Name of Security
              3. Analogy to Pull It All Together
              4. What About Network Security Groups (NSGs)?
              5. Import Networking Concepts
                1. Hub-and-Spoke Will Avoid Headaches
                  1. Dive Deeper into Hub and Spoke
                2. Source Address Network Translation (SNAT)
                  1. Dive Deeper into SNAT
              6. Give Me Some Options Already
                1. Virtual Appliance/Firewall (My Preference)
                2. NAT Gateway
                  1. Dive Deeper into NAT Gateway
                3. Public Load Balancer with Outbound Rules
                  1. Dive Deeper into Public Load Balancer
                4. Instance Level Public IP Address
              7. In Closing

              In The Name of Security

              Outbound by default is a security risk. Zero trust means you don’t trust anything by default – including egress traffic. Endpoint detect and respond (EDR) technologies and eXtended Detect and Response (XDR) technologies, such as Defender for Endpoint, are not perfect. Zero-day exploits leave your machine vulnerable, even if you diligently apply the latest security patches.

              The defense in depth mindset means you have multiple layers of controls to prevent attacks and data exfiltration. Managing egress traffic adds controls to the network layer (above and beyond controls you have on the VM itself).

              As a relevant example of defense in depth, assume you are managing an API only intended for trusted third parties. There are many ways to implement authentication and authorization between clients connecting to your API and the services handling those requests (access tokens, OAuth, mutual-TLS, etc.). If you know the IPs of clients accessing your API, additional depth can be added to your defenses with source IP restrictions. If source IP(s) of the trusted party are known and consistent, you can add more layers of depth to your defenses with source IP restrictions. This creates a situation where APIs are only access by a known location (the IP address) using a proven identity (the authentication process).

              Analogy to Pull It All Together

              I love using analogies to explain technical concepts. I’ll be referring to an analogy when explaining concepts in this article.

              Consider a sensitive government research facility at an undisclosed location with strict policies for sending communication packages. Assume your VM is an analyst communicating with an affiliate in a different country. There is a certain amount of trust between the two countries, but the sensitive nature of things does not allow blind trust between the two (packages are not allow to flow freely between the two).

              How will the request and response packages between these two affiliates be managed? Keep reading…

              What About Network Security Groups (NSGs)?

              NSGs allow you to define network layer controls for specific subnets and/or network cards (NICs). You can specify acceptable inbound and outbound IP address and port combinations.

              NSGs compliment how you manage outbound traffic, but they are not involved in sending the packets to the public Internet.

              To explain in the analogy, the department supervisor acts like a NIC level NSG and applies criteria to determine the analyst’s outbound package is going to an acceptable destination. The package is then handed to the facility supervisor that acts like a Subnet NSG. Using their own criteria, the facility supervisor also makes sure the package is going to an acceptable destination.

              At this point, the facility supervisor hands the package to a courier. The courier ensures the package (which is going to a different country) is marked in a way that responses can be returned, without exposing the origin of the package (which is the undisclosed facility).

              While the department supervisor and facility supervisor act like NSGs, the courier plays a very different function and is not an NSG. This article focuses on the different ways to setup couriers.

              Import Networking Concepts

              Before jumping into the design options, it’s worth taking a moment to clarify a few applicable networking concepts. If you want to dive further into these, I’ve included links to articles I’ve found helpful.

              Hub-and-Spoke Will Avoid Headaches

              An ounce of prevention is worth a pound of treatment

              Weathered old wagon wheel on a freight wagon.

              Using hub-and-spoke design can dramatically simplify how you solve the dilemma private subnets introduce.

              It’s rare to see an entire application landscape (both Production and Non-Production environments) running within a single VNET. At a minimum, you want to have a Production and Non-Production environment for each application and those should be in a separate VNET.

              I totally understand you can technically put all the environments for your application(s) is a single VNET; however, it reflects low operational maturity. This typically implies the team doing development has full-access to the production environments, not to mention you are exposed to lateral movement by an attacker.

              Moreover, if you’re putting both Production and Non-Production environments in the same VNET, it complicated access controls and will be near impossible to pass a compliance audit for standards like: SOC2, ISO27001, HIPAA/HITRUST, or NIST 800-53!

              With that said, it is also very common for an application to communicate with other applications/services that are not exposed to the public Internet. These applications/services may be running in:

              • other Azure VNETs
              • other public clouds
              • other private clouds
              • other on-premise datacenters

              Regardless of which specific scenario, “hub-and-spoke topology” is a tried-and-true scalable design to manage private network traffic flows between these services and public Internet egress.

              Explained in simplest terms, individual VNETs are peered with a single common VNET. If you diagram it out, this looks like a wagon wheel, the common VNET is the hub (connected to the axel) and the spokes span outward.

              The hub network acts as a common point for communication that passes outside a spoke VNET (whether the destination is the Internet, a different spoke peered to the hub, a spoke peered to a different hub, or somewhere on the other end of a VPN or ExpressRoute connection).

              Dive Deeper into Hub and Spoke

              Hub-and-spoke topologies can be implemented through structured VNET peering, Azure VWAN service, or the Azure Virtual Network Manager

              Source Address Network Translation (SNAT)

              Source Network Address Translation (SNAT) is the process of translating a private IP address to a public IP address. The service performing SNAT uses ports to keeps track of the different translations to make sure response packets (which are sent to the public IP address) get routed back to the correct private IP address (the requester).

              Going back to the analogy, the courier needs to mark the package in a way that the recipient can send a response, but since the origin is an undisclosed facility, the courier can’t just put the origin address on the package – the courier applies a return address so when the response comes back the courier can forward the package back to the facility of origin.

              If the courier gets overwhelmed with packages, the process of shipping to destination o will slow down or the courier may just start rejecting new packages. High amounts of outbound requests can lead to SNAT exhaustion which means outbound requests will intermittently fail. This point is discussed later and is important to understand when selecting the best option for managing outbound traffic.

              Dive Deeper into SNAT

              Use Source Network Address Translation (SNAT) for outbound connections provides a deeper explanation of SNAT. All of the options discussed in this article rely on SNATing to manage outbound requests.

              Give Me Some Options Already

              Secure your subnet via private subnet and explicit outbound methods provides a good technical description of options. This article is not intended to regurgitate information in that article; rather provide a more opinionated take on the options and decision flow from an architect perspective.

              Opinionated decision tree

              Virtual Appliance/Firewall (My Preference)

              This is a “go-to” design for enterprise security. I am disappointed how little focus the aforementioned article gave to this approach. This design effectively shifts details for managing Internet outbound requests to the firewall implementation, thereby reducing concerns on how to achieve outbound Internet connections from the spoke VNET. In other words, the team creating application specific infrastructure going into the VNET (the “applistructure”) only has to make sure the firewall will allow requests to the destinations – they don’t need to worry about implementing other methods described in this article.

              When you are using the previously described hub-and-spoke design, user defined routes (UDRs) send requests destined outside the immediate VNET (targeting public Internet, other spokes, VPN gateways, etc.) to a firewall that resides in the hub VNET. This can be either an Azure Firewall or, if you prefer 3rd party solutions, a Virtual Appliance like Palo Alto, Cisco, Checkpoint.

              In the hub-and-spoke rant above, I link to articles describing different methods to implement that pattern and those all include details about enabling firewalls in the hub.

              Regardless of the technology, the firewall is responsible for SNATing outbound requests to the public Internet – but it only allows requests if firewall rules agree.

              Pointing to the analogy, the firewall is like a courier that handles forwarding the package to it’s destination. Unlike other methods described in this article, this Firewall Courier applies their own set of rules to ensure the destination is acceptable. The Firewall Courier may even inspect contents of the package to make sure nothing that shouldn’t be sent gets sent.

              NAT Gateway

              This approach is the most scalable method of managing outbound requests, but it is not the most secure – it doesn’t apply any restrictions to outbound requests.

              There are a few situations to use the NAT Gateway approach.

              • Hub-and-spoke with a firewall is just too much for the situation (too complicated, too costly and you don’t need the security, etc.), AND you need more scalability than Public Load Balancer or Public IP options provide
              • The hub firewall has outbound requests exceed capacity (SNAT exhaustion) of Public IP or Public Load Balancer so you need to place NAT Gateway between the firewall and the public Internet
              • The hub firewall appliance cannot be associated with Public IP addresses or use Public Load Balancer (for some odd reason)

              Reverting to the analogy, the NAT Gateway Courier doesn’t apply rules to determine if the destination is acceptable nor does it inspect package contents. This means, if you are directly sending traffic to a NAT Gateway, NSGs are the only method you can use to control acceptable destinations (which can be a very complex endeavor). Of course, if the Firewall Courier is subcontracting to NAT Gateway Courier, the Firewall Courier is only passing along packages that have been approved (so you get both scalability of NAT Gateway and security of a firewall).

              Dive Deeper into NAT Gateway

              Azure NAT Gateway documentation provides a lot more detail on how the NAT Gateway scales and can be implemented.

              Public Load Balancer with Outbound Rules

              WARNING: Understand the risks whenever you put VMs behind a Public Load Balancer

              The public Internet is more vicious than you think. If you don’t believe me, create a honeypot and see how long it takes for your machine to get attacked or even fully pwned – you may even find your device in search results on shogun.io

              This design leaves all the VMs receiving traffic from the Public Load Balancer exposed to the public Internet – so inbound NSGs are essential. NSGs provide a line of defense before inbound packets get to the VM itself (and NSGs have a default rule that denies all inbound requests from the Internet).

              If you putting a pool of virtual appliances behind the Public Load Balancer, that is a bit different scenario (vendors harden those machines) but NSGs are still recommended to ensure administration ports cannot be accessed by untrusted sources over the public Internet.

              Having fully emphasized the security concerns, this design has limitations:

              • All VMs sending outbound traffic through the Public Load Balancer must be in the same VNET
              • If VMs send too much traffic through the Public Load Balancer (SNAT exhaustion), you need to associate more Public IP addresses with the Load Balancer’s front end. There is a limit to the number of Public IP addresses you can associated with the Public Load Balancer so there is a true-limit – but honestly, if you have that many VMs in the same VNET, you may want to reconsider your network design.

              Dive Deeper into Public Load Balancer

              Use Source Network Address Translation (SNAT) for outbound connections describes this approach in more detail, but it also describes several of the outbound methods in this article.

              Instance Level Public IP Address

              WARNING: Understand the risks whenever you associate a Public IP address with a VM

              Just like the Public Load Balancer approach, inbound NSGs are critical if you use this design.

              From a cost and scalability perspective, this design only provides a single VM the ability to communicate with the Internet. Other VMs in the same network cannot connect to the Internet. If you need to enable outbound communication on many VMs, consider one of the other approaches.

              In Closing

              There is no silver-bullet to enabling outbound connectivity, however each approach has trade-offs to security, scalability, and cost. After reading this and examining the decision tree you are well-equipped to move from problem (my VMs can’t initiate requests to the public Internet) to solution (one of the four approaches described in this article).

            • Retrieval Augmented Generation (RAG)

              TL;DR

              Large Language Models (LLMs) are masters of language and will assert lies with a smooth tongue of conviction. These hallucinations are most prominent when you prompt an LLM on subjects not included in their training datasets.

              Retrieval Augmented Generation (RAG) is a cost-effective pattern to improve a Large Language Model’s (LLM) expertise on specific knowledge bases. It’s like having a studious book-worm that can rapidly read the information corpus; they can talk about the content and make reference to specific sources cited.

              RAG pattern allows you to provide grounding data to your LLMs; this “educates” your LLM and improves their context, response quality, and source citing abilities.

              1. TL;DR
              2. How Can RAG Help You?
              3. Explaining RAG In Simple Terms
              4. Standard RAG in 60 Seconds
              5. Still Room For Progress

              How Can RAG Help You?

              Armand Ruiz’s LinkedIn post does a great job summarizing benefits of using the RAG pattern.

              1. Access to up-to-date information The knowledge of LLMs is limited to what they were exposed to during pre-training. With RAG, you can ground the LLM to the latest data feeds, making it perfect for real-time use cases.
              2. Incorporating proprietary data LLMs weren’t exposed to your proprietary enterprise data (data about your users or your specific domain) during their training and have no knowledge of your company data. With RAG, you can expose the LLM to company data that matters.
              3. Minimizing hallucinations LLMs are not accurate knowledge sources and often respond with made-up answers. With RAG, you can minimize hallucinations by grounding the model to your data.
              4. Rapid comparison of LLMs RAG applications allow you to rapidly compare different LLMs for your target use case and on your data, without the need to first train them on data (avoiding the upfront cost and complexity of pre-training or fine-tuning).
              5. Control over the knowledge the LLM is exposed to RAG applications let you add or remove data without changing the model. Company policies change, customers’ data changes, and unlearning a piece of data from a pre-trained model is expensive. With RAG, it’s much easier to remove data points from the knowledge your LLM is exposed to.

              Explaining RAG In Simple Terms

              This six minute video explains RAG using simple English and story-telling.

              Standard RAG in 60 Seconds

              RAG is a pattern that can be implemented using many tactics. This video explains the flow of a “standard” RAG implementation. Check out related posts in this blog to explore more advanced patterns to improve LLM responses.

              Still Room For Progress

              The studious librarian isn’t perfect and neither is RAG. Set realistic expectations by understanding these short-comings. More advanced RAG patterns aim to improve on these areas and there is a large amount of research focused on this – stay tuned!

              • No Reasoning Capability RAG systems rely on retrieving static information but lack reasoning capabilities to analyze, synthesize, or infer new insights beyond what is retrieved. For example, if you feed a bunch of Facebook posts to an LLM and ask, “how is person X related to person Y?” the LLM cannot figure that out, unless there is a post directly providing that kind of statement.
              • Override General Knowledge Retrieved data can sometimes override the general knowledge embedded in the model, leading to incorrect or overly specific responses when the retrieved context is flawed or overly narrow. If imported all of the Star Trek episodes into a data set and ask, “what is the fastest speed a spaceship can travel?”, you’re likely to get an answer in warp speed – not yet possible in the real-world.
              • Semantic Search Shortcomings Semantic search algorithms may not capture the nuance of keywords in queries, leading to mismatches between terms in the vector database and user queries, reducing the effectiveness of retrieval.
              • Scaling Issues with KNN Algorithms As datasets grow in size or diversity, k-nearest neighbor (KNN) algorithms struggle with scalability, resulting in slower retrieval times and inefficiencies in handling large knowledge bases.
              • Chunk Sizing Leads to Information Gaps The process of splitting documents into chunks for retrieval can create gaps, causing important context to be lost or fragmented, reducing the accuracy and relevance of generated responses.
              • Garbage In, Garbage Out If the knowledge base contains outdated or biased information, the LLM will generate similarly outdated or biased responses, which can compromise the reliability of the model.
              • Dependency on Pre-Indexed Data RAG models depend heavily on pre-indexed data, which means that the system can only retrieve information from what has been stored in the vector database, limiting real-time updates or external data sources.
              • Complexity in Fine-Tuning Adjusting the retrieval mechanisms or integrating new types of data often requires additional fine-tuning of both the retrieval system and the LLM, which increases complexity and maintenance efforts.
              • Latency Issues The retrieval step can introduce latency, especially when querying large datasets or using less efficient retrieval methods, which can slow down response times in real-time applications.
              • Cost of Maintaining Up-to-Date Knowledge Base Keeping the knowledge base current requires constant updates and re-indexing, which can be resource-intensive and costly, especially for large-scale or fast-changing domains.
              • Contextual Inconsistency Sometimes, the retrieved documents might not align contextually with the user query, leading to incoherent or off-target responses. This is particularly problematic when the system retrieves irrelevant data.
              • Limited Handling of Multimodal Information RAG systems are typically focused on text-based data, and incorporating multimodal inputs (e.g., images, audio) remains a challenge in maintaining the effectiveness of retrieval.